| ||
| ||
| ||
| ||
| ||
| ||
| ||
| ||
| ||
| ||
| ||
|
1-877-WEB-2002 Toll-free Help Line This User Guide was built with website2Go. Support  E-mail
© Copyright 2000 website2Go All Rights Reserved |
| Adding Products to the Database |
When you click on the Add Product button in the website2Go Commerce Editor, you are taken first to a screen to choose a product type from a popup menu. The product type determines what product characteristics will be used in the database record, such as model number, color, and size. If your product requires characteristics not available in any of the predefined types, please contact us and we will create a custom product type for your store.
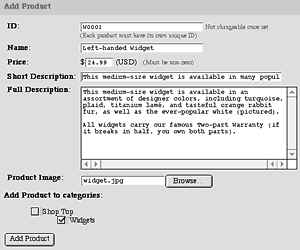
When you click the Next button, you'll see the product database entry screen. Complete the entry fields as follows:
ID: This is where you can assign an internal product identification code. It could be a part number, catalog item number, or anything you wish, but each of your products must have a unique ID. You may change the label "ID" to something else in the Product Types preference of your Shop Manager.
NOTE: You cannot edit existing Product IDs, because categories and pending shopping carts use them to identify your products. To change an ID, you must delete the product and re-enter it with the new ID. This will automatically remove the old product from all categories and carts. It will not substitute the new product in its place; you must do that yourself.
Name: This is the name of the product, which will appear on all instances where the product is displayed on your site pages.
Price: The price, in the currency unit you have chosen in the Shop Preferences screen.
Short Description: Appears on category pages, and on site pages where you use the Add Product button in the website2Go site Editor to add the product's thumbnail and information (but not if you elect to place only an Add to Cart button).
Full Description: Appears on the Product page.
Product Image: Use the Browse button to locate an image of your product to be uploaded when you click the Save Product button. Image requirements are identical to those in the Site Manager: the Editor will display product images proportionally at no more than 300 pixels wide in the Content column on Product pages, or 100 pixels wide or tall, whichever is greater, as thumbnails on category pages and when placed on Site Manager pages. The actual size in the image file will not be changed, only its appearance onscreen, but we recommend that you scale your images to 300 pixels wide before uploading them, for best appearance and shortest customer download times.
Add Product to Categories: Check the category page(s) in which you wish this product to appear. (For example, you might have separate categories by product function and by manufacturer, and here you can assign one product to both catalog pages without having to enter it twice.)
Click the Add Product button to add the product to your database.